Welcome to the fifth and final installment of the How-to Build a Low Budget Usenet Download Machine series. In this guide, we will walk you step-by-step all the way through installing, setting up, and configuring SABNZBd on your Raspberry Pi. We will also cover getting your Pi primed for downloading from your UsenetServer account.
Since we’ve started this How-to Build a Low-Budget Downloading Machine series, we have shown you how to gather the parts necessary to build your Pi, set up the Raspbian OS, set up remote access to your Pi using SSH over your network, and set up storage on your Pi. Before attempting to follow this guide and install SAB, we highly recommend you review the required guides mentioned above — doing so will make your life so much easier to get SAB running on your Pi. Before proceeding any further, you should have a working, powered-on Raspberry Pi with Internet access that you can login into directly or remotely via SSH.
Updating Apt-Get and SABnzbd
Before we do anything else, we need to update and upgrade the apt-get installer.
To do so, type in the following commands in the terminal:
sudo apt-get update
sudo apt-get upgrade
If it’s been a while since you updated, you may want to go have a Coke and smile because it could take a while for the update process to complete. Once the upgrade is complete, we are ready to get down to business and install SABnzbd on our Pi.
To install SABnzbd, type the following command at the terminal:
sudo apt-get install sabnzbdplus
This command will install the core dependencies for SABnzbd, including several Python tools (like the RSS Feed Parser and Cheetah template gallery) as well as the basic SABnzbd themes. During the package install process, you’ll see the following error at some point:
This is not important at this point because it is just SAB letting us know that we do not have a news server configured for use. This, of course, makes sense because we haven’t even set SAB up yet. After the install finishes, you are ok to move to the next section,
Running the SABnzbd Setup Wizard
After the sabnzbdplus installation has finished, you’ll be returned to the command prompt. Enter the following command to launch SABnzbd for the first time:
sabnzbdplus --server 0.0.0.0
The command starts the SABnzbd daemon and turns on the WebUI. Several commands will scroll by and then it will stop and give the impression that the application has crashed, but it hasn’t. It has just taken control of the terminal, and as it performs, new functions they will appear here. Open up a new terminal window or SSH connection (if you CTRL+C to break out and return to the command prompt, you’ll cause the daemon to shut down).
From either a browser on the Raspberry Pi or a remote browser on your desktop, you can now start up the configuration wizard. We’d strongly advise you to use a remote web browser for ease of use and better performance.
Open a browser and go to:
http://[Your Pi's IP]:8080/wizard/
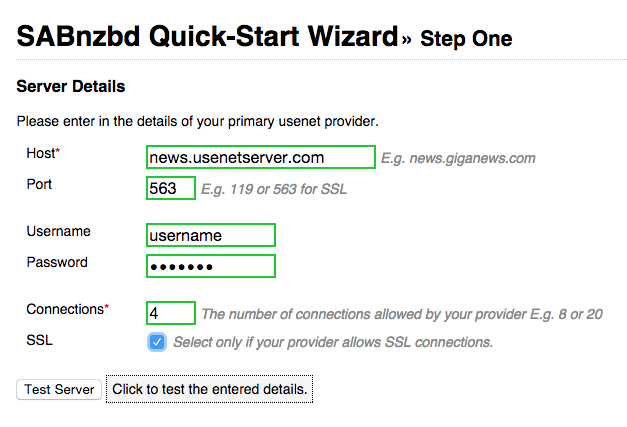
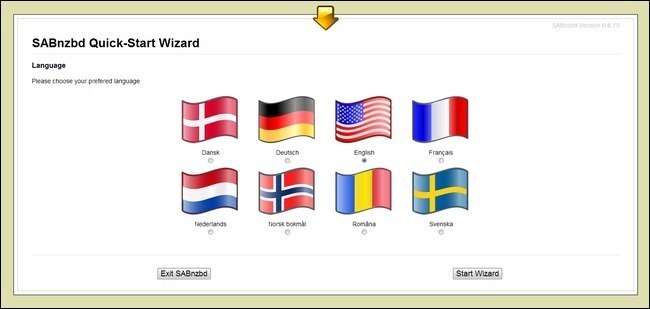
Select your preferred language and click “Start Wizard.” The first step is to input your UsenetServer account information:
Input news.usenetserver.com for the the host, port, username/password, and set the number of connections. While you can easily get away with 20+ connections on a desktop or server installation, we suggest starting with four connections on your Pi and gradually increasing the number upwards if you find you need more concurrent connections. Click Test Server to make sure you get connected to our servers without any issues.
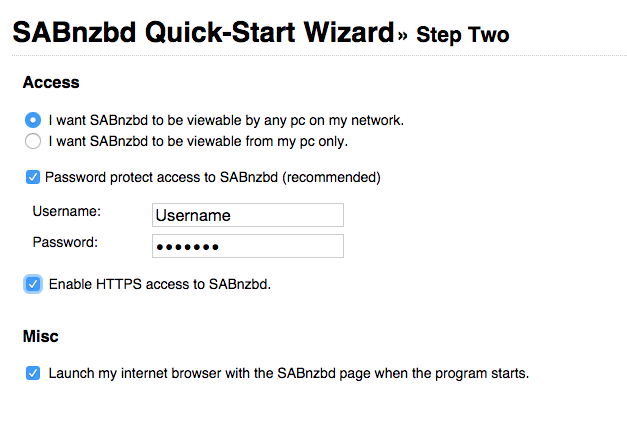
Step two of the wizard sets the access control:
If you would like to be able to access the SAB web interface from any device on your network and not just your PC, select the first option under the Access section. We also recommend you password-protect your SAB web interface by checking the password protect box and entering in a username and password of your choice. If you would like the web interface to be secured using SSL, check the box to enable HTTPS and move on to the next step (we do recommend you enable this option).
You can skip step three of the quick-start wizard altogether, unless you need to configure NZB search services. Click “Next” to skip ahead to step four. Step four is automated, SABnzbd will restart, and the wizard will show you the web addresses where you can access the WebUI, like so:
http://192.168.0.102:8080/sabnzbd/

http://raspberrypi:8080/sabnzbd/

http://127.0.1.1:8080/sabnzbd/
Go ahead and click on one of the SAB links or “Go to SABnzbd” and you’ll be taken to the SAB web interface.
Installing UNRAR for Automated Unpacking
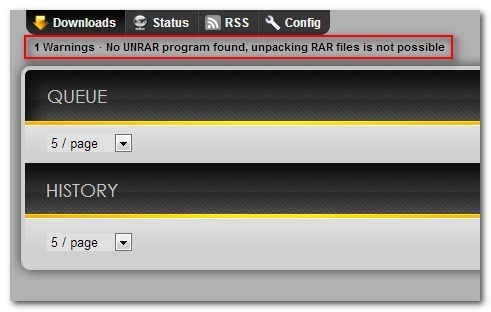
Now that you are logged into SAB and looking at the new spiffy webUI, you might notice there is a problem. We are getting a warning: “No UNRAR program found, unpacking RAR files is not possible”.
Guess what? SABnzbd’s core installation package doesn’t come with a unRAR utility. What this means is that SAB will download your favorite NZB posts from the Usenet, although you will have to manually unpack and decompress the RAR files as they come in — but we wouldn’t stand for that nonsense. So instead, we’re going to install an unrar-nonfree utility.
In order to automate the file unpacking, we’re going to have to build a copy of the free but oddly-named unrar-nonfree app. Luckily, we found a step-by-step guide from someone over at RaspberryPi.StackExchange who outlined just how to do so for Raspian.
At the terminal, enter the following command to allow you to edit your sources.list and add the repository that contains unrar-nonfree:
sudo nano /etc/apt/sources.list
In nano, add the following line to the .list file:
deb-src http://archive.raspbian.org/raspbian wheezy main contrib non-free rpi
Press CTRL+X to exit nano and Y to save/overwrite the old .list file. Back at the command prompt, you will need to update your sources list for the change to take effect:
sudo apt-get update
After the update is finished, it’s time to create a working directory and then change to it:
mkdir ~/unrar-nonfree && cd ~/unrar-nonfree
Time to download unrar-nonfree’s dependencies:
sudo apt-get build-dep unrar-nonfree
When the process finishes and you’re back at the prompt, enter the following command to download the source code and build the installation package:
sudo apt-get source -b unrar-nonfree
Now it’s time to install the package. If you’re following this tutorial after a new version of unrar-nonfree is released, you’ll need to update the filename. You can check the version number by typing “ls” at the command prompt to list the files we downloaded in the previous steps:
sudo dpkg -i unrar_4.1.4-1+deb7u1_armhf.deb
Once the installation is complete, you can quickly test to see if command “unrar” is available to the system by simply typing “unrar” at the command prompt. If properly installed, the unrar app will send back a list of all the available unrar switches and their descriptions. If the package installed without error, you can tidy up after yourself with the following command:
cd && rm -r ~/unrar-nonfree
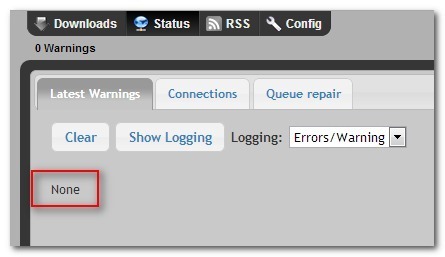
Now it’s time to get rid of that error in SABnzbd. Restart SABnzbd from within the WebUI by clicking on Options > Restart (upper right hand corner of page). When you restart, the error message should be gone. You can make sure that the error log is empty by clicking on the Status link in the upper left hand corner:
The last thing we need to configure is our storage directories for SAB. As of right now, everything is configured to be downloaded and stored on our Pi’s SD card, which is not what we want as it would fill up fast. We need to setup our SAB directories to take advantage of our large USB storage drive(s) that we configured earlier in our Setting Up Storage on the Pi guide. Let’s get those directories setup.
Configuring the SABnzbd Directories
To avoid filling up your SD card and having SAB come to a screeching halt, we’re going to move all the important directories off the SD card and on to the external hard drive. If you do not already have a USB hard drive attached to your Raspberry Pi and set to auto-mount at boot, you should read Setting Up Storage on the Pi to find out how to get it setup. We’re going to use the same HDD naming convention and directory structure we used in that guide, so adjust your commands in this section to match the location of your HDD.
First, let’s create the directories we need for SABnzbd:
sudo mkdir /media/USBHDD1/shares/SABnzbd/downloading

sudo mkdir /media/USBHDD1/shares/SABnzbd/completed

sudo mkdir /media/USBHDD1/shares/SABnzbd/watch

sudo mkdir /media/USBHDD1/shares/SABnzbd/watch/nzb-backup

sudo mkdir /media/USBHDD1/shares/SABnzbd/scripts
After creating the directories, return to the WebUI of SABnzbd to change the default directories. In the WebUI, navigate to Config > Folders. There are two sections: User Folders and System folders. Within those two sections, change the following entries using the folders we just created. You must use absolute paths to force SABnzbd to use folders outside the default of /home/pi/.
Temporary Download Folder:
/media/USBHDD1/shares/SABnzbd/downloading
Completed Download Folder:/media/USBHDD1/shares/SABnzbd/completed
Watched Folder:/media/USBHDD1/shares/SABnzbd/watch
Scripts Folder:/media/USBHDD1/shares/SABnzbd/scripts
.nzb Backup Folder:/media/USBHDD1/shares/SABnzbd/watch/nzb-backup
In addition to these changes, you should set the “Minimum Free Space for Temporary Download Folder” by using designations such as 900M for 900 megabytes or 20G for 20 gigabytes. You should generally leave 10-20GB free on your disk to serve as a nice buffer and cushion.
Once you have made all your changes, click Save at the bottom of the menu. The changes we made require a restart. To restart, click Downloads to return to the main WebUI screen and then click Options > Restart in the upper right hand corner. Now that our directories are setup, we can finally test SAB by downloading an NZB.
Testing Your SABnzbd Install
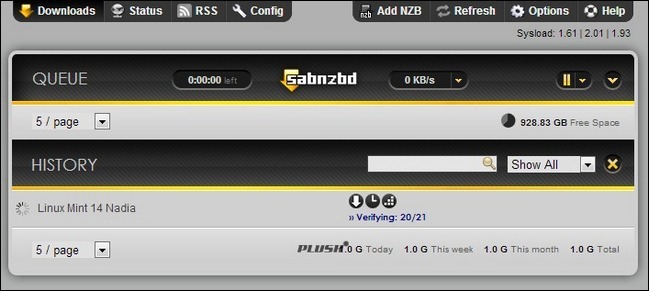
After SABnzbd restarts, it’s time to test it and make sure we can download something without any issues. For our test, we visited Binsearch.info and found a copy of Linux Mint to download. To start the download, we dropped the .NZB file into the SABnzbd /watch/ folder where SABnzbd will automatically snatch it up. Alternatively, you can click the Add NZB button at the top of the WebUI and add the NZB that way also. It will appear in the Queue and then transfer to the History section of the WebUI as it shifts from downloading to verifying and unpacking, as seen in the screenshot above.
